raspberry pi 影音串流

Raspberry pi 記錄3-關於Pi Camera和即時串流(MJPG Stream Server)
個人目前可以及時在xrdp下看圖片都是靠這個的
其中主要要注意的部分是在安裝套件的時候
以下可以不裝(直接用MJPG Stream Server代替)   這個看起來可以控制 還蠻不錯的感覺
sudo apt-get install uv4l-server
 
看來是正常了
        設定一下alias方便使用///////////////////////////這後面我都還沒做
啟動server
cd code/mjpg-streamer
./mjpg_streamer -i "./input_uvc.so" -o "./output_http.so -w ./www"

(46)

Facebook Comments

關於VirtualBox 及一些自我實作

重設硬碟大小
個人主要是先到該軟體的位置,再下指令 目標位置” -resize 大小
 
官方調整硬碟大小文件
結果最後因為磁碟找不到而作罷  砍掉重練 gan!!!!

(94)

Facebook Comments

Ubuntu螢幕相關

Ubuntu 用 xrandr 指令切換外接螢幕 
用內建的指令去使用
xrandr    列出目前所有的螢幕
 
eDP1是我內建的螢幕,DP1是我外接的View Sonic Corporation 19″
還可以調整螢幕的解析度及更新頻率 等等
藉由 Disper 自動切換延伸桌面 
目前 disper 與 disper-indicator 還未列入官方的套件庫,故需手動加入 PPA 上的來源。
先新增套件來源,在下載
sudo add-apt-repository ppa:disper-dev/ppa && sudo aptitude update
sudo aptitude install disper
disper l 列出目前螢幕
disper d auto e 使用雙螢幕 且延伸桌面 extend

(14)

Facebook Comments

Configuring tmux (4) – plugins

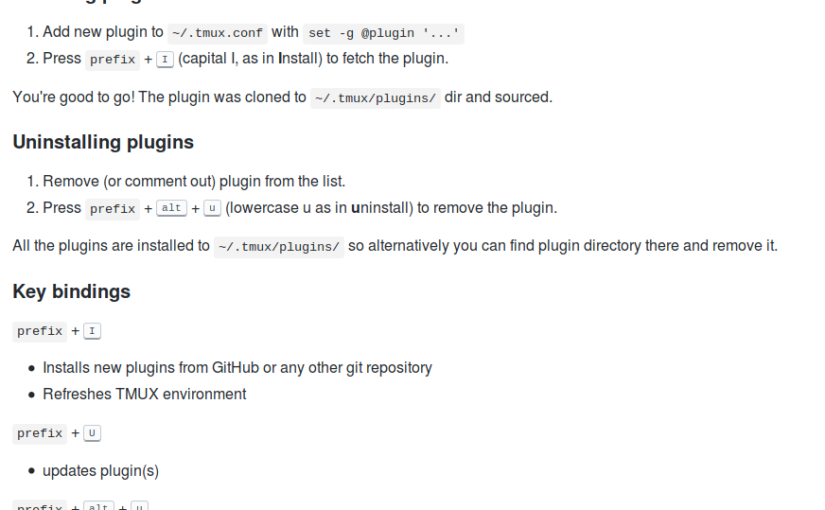
有很多好用的plugins設定可以使用

參考

https://github.com/tmux-plugins

其中我使用了tpm,yank,battery,urlview這幾個套件都蠻好用的

tpm為tmux plugins manager

How to use

===

$ git clone https://github.com/tmux-plugins/tpm ~/.tmux/plugins/tpm

$vim .tmux.conf

set -g @plugin 'tmux-plugins/tpm'
set -g @plugin 'tmux-plugins/tmux-yank'
# Initialize TMUX plugin manager (keep this line at the very bottom of tmux.conf)
run '~/.tmux/plugins/tpm/tpm'

source :https://github.com/tmux-plugins/tpm

(11)

Facebook Comments

Configuring tmux (3)

此篇是要紀錄一些我使用的快捷見

常見的有人們使用的

bind C-a send-prefix
#Ensure that we can send Ctrl-a to other app
#讓其他的程式也可以收到ctrl+a

bind | split-window -h
bind _ split-window -v
#splitting panes with | and _

bind -r h select-pane -L
bind -r j select-pane -D
bind -r k select-pane -U
bind -r l select-pane -R
#use the -r flag is more efficient to me //laudai

bind -r C-h select-window -t :-
bind -r C-l select-window -t :+
#Quick window selection
#let you quick to next , previous window . equal prefix n ,p

bind -r H resize-pane -L 5
bind -r J resize-pane -D 5
bind -r K resize-pane -U 5
bind -r L resize-pane -R 5

而我自己新增的

===

bind m \
set -g mouse on \; display “Set Mouse: ON”
# Toggle mouse off
bind M \
set -g mouse off \; display “Set Mouse: OFF”

bind -n M-k confirm-before -p “kill-window #W? (y/n)” kill-window
bind -n C-k confirm-before -p “kill-session #S? (y/n)” kill-session
bind -n C-o rotate-window

bind -n M-| select-layout main-vertical
bind -n M-_ select-layout main-horizontal
bind -n C-\ select-layout even-horizontal
bind -n C-_ select-layout even-vertical
bind -n C-t select-layout tiled


(7)

Facebook Comments

Configuring tmux (2)

Change your tmux apperance

also use the vim or your editor
$vim .tmux.conf
setting the window and panes index
set g base-index 1 將預設0改成1
setw g pane-base-index 1 


更改 horizontal vertical 的符號
bind | split-window h
bind – split-window v

將切換pane改成hjkl

bind h select-pane L
bind j select-pane D
bind k select-pane U
bind l select-pane R
this is my setting
===
106 set -g status-interval 1
107 #Update the status line every seconds
108 #mind that if u have shell command ,those will be executed once per interval
109 #so be careful not to load too many resource-intensive scripts.
110
111 set -g status-style fg=white,bg=colour235
112 #set the status line’s color
113 #這裡設定的是全部的預設值,如果其他設定值是default,那麼就會吃這裡的設定值
114
115 setw -g window-status-style fg=colour102,bg=default
116 #set the color of the window list
117 #設定 1 2 3 4 等等索引地方的顏色
118
119 setw -g window-status-current-style fg=red,bold,underscore,bg=default
120 #set colors for the active window
121 #設定當前激活的視窗索引的顏色與背景顏色
122
123 set -g status-left-length 80
124 set -g status-left ” #[fg=colour160]#S #[fg=colour209]視窗:#I #[fg=colour220]窗格:#P #[fg=colour34]#(ifconfig eno1 | grep ‘inet ‘ | awk ‘{print \” eno1 \” $2}’)#(ifconfig wlp2s0 | grep ‘inet ‘ | awk ‘{print \”wlp2s0 \” $2}’)”
125 # show the session name , window , pane , IP address
126 # ref: https://zanshin.net/2013/09/05/my-tmux-configuration/
127
128 set -g status-right-length 60
129 set -g status-right “#[fg=colour111]\”#H\” #[fg=colour82]%H:%M:%S #[fg=colour208]%m/%d %a #{cpu_fg_color}CPU:#{cpu_icon}#{cpu_percentage} #[fg=bla ck]#{battery_status_bg}Batt:#{battery_icon}#{battery_percentage} #(upower -i /org/freedesktop/UPower/devices/battery_BAT0 | grep ‘time to empty’ | awk ‘{print $4 $5}’)#(upower -i /org/freedesktop/UPower/devices/battery_BAT0 | grep ‘time to full’| awk ‘{print $4 $5}’)”
130 #Status line right side to show “ldv” 22:10:25 03/05 Mon CPU:= 4.42% Batt:? 53% 2.9 hours
131

(17)

Facebook Comments

Tmux 基本用法

前提概念

安裝完tmux過後,即可使用

tmux是一款偽shell session的工具

A session is a single collection of pseudo terminals under the management of tmux.

預設用法有一個前綴動作 稱為profix,組合鍵為

Ctrl+B

新開視窗

profix + c

切割畫面

profix + % or profix +”

查看時間

profix+ t

查看session

profix + s

(22)

Facebook Comments

Tmux 基本指令與概念

目前我使用的版本有2.1 , 2.5
raspberrypi 上常有的有1.8,1.9
2.3 , 2.4過後改蠻多的,很多指令不能使用
 How to install
in Hobebrew :
brew install tmux
in Ubuntu :
sudo apt-get install tmux
also you can grab via github
https://github.com/tmux/tmux
基本指令
===
查看版本
tmux -V
新增session
tmux new -s name
列出目前所有的session
tmux ls
連回最近的session
tmux attach (tmux a)
砍掉特定連線
tmux kill-session -t sessionname
題外話 推廣ZSH + VIM + TMUX
yt影片

下回介紹 Tmux簡單用法

(69)

Facebook Comments